Fixing toilet problems is something that everybody at one time or another is going to have an issue with. The thing is that back in the day if it kept running after the bowl filled up, made a strange noise in the tank, or whatever the problem was, finding a part was fairly simple in that about every home in the United States had about the same style handle, flapper, valve, float, and tank bushings. Not to mention the ole reliable plunger still sitting in the corner in every home.
Not so much today. Like the evolution of the mousetrap, also has developments came about with the toilet. I am going to attempt to cover the basics while also including some of the most popular tank hardware, what can go wrong, and most importantly, how to fix it. Butt first a little history. Yes, pun intended!
Bringing Up Old Shit
Thousands upon thousands of people died of water-borne illness from polluted water in medieval times around cities where people would use potties and throw the contents out of windows and doors into the streets and alleys.
Public toilets were built but as the population grew it left hundreds of people using the same facilities which further polluted the water table. This gave way to disease and sickness that continued till finally in the mid-1800s when London England completed the government commissioned sewer system that soon after saw a steep decline in water-borne diseases.
The British Are Going
Looks like all of these advents were of British origins. I guess they were good at something besides taxes.
Have you ever heard the phrase, “Going to the John?” Ever wonder how the name John came about? Well, history tells us that the first flush-able toilet was a deep oval bowl waterproofed with resin, wax, and pitch that had a cistern that supplied gravity-fed water to flush the waste. This was engineered by Sir John Harington, godson of Queen Elizabeth 1.
- 1596 – St. John Harington made the first flush-able toilet
- 1756 -JF Brondel made a valve-type flush toilet.
- 1775 – Alexander Cumming invented the ‘S’-shaped trap and was the first to patent the flushing water closet.
- 1777 – Samuel Prosser patented a plunger-type valve that released the waste and sealed the drain.
- 1778 – Joseph Bramah invented a hinged valve and a float valve for the cistern.
- 1852 – Josiah George Jennings invented a design by which a shallow pan emptied into an S-trap. He popularized public lavatories or ‘Retiring Rooms’ by installing them in the Crystal Palace for the Great Exhibition of 1851.
- 1870 – Thomas Twyford created the one-piece toilet, and called it the Unitas. This utilized a ‘P’-shaped trap. He made the first valveless toilet comprised of china.
- 1880 Thomas Crapper made the water closet popular that used a water siphon system for emptying the cistern, or water closet. It eliminated problems of the earlier floating valve systems that tended to leak. Going to the Crapper may have origins from Thomas.
- It was not long after this that the water closet was brought down off the wall and positioned on the back of the toilet much like the modern-day toilets that we use today.
Modern Day Toilet
The common household commode has not really changed a lot. The basics have stayed the same as far as function goes but there have been a few innovations since the corn cob went out. Colors were one area of change where there used to be only the white porcelain toilets but starting around the sixties, different colors were available.
They were more of a pastel shade but I can remember seeing green, pink, and blue ones during my travels in the US. Nowadays black, almond, and gray seem to popular but other colors are available. The shape of the bowl can also be a preference with either a round or oval configuration.
Fixing a Running Toilet
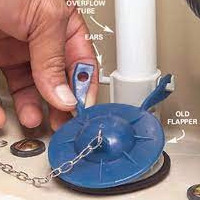
If your toilet keeps running long after you flush and the bowl has refilled, then you are probably going to need a flapper. You can purchase these at any hardware with many varieties to choose from. Keep it simple and don’t get drawn in by any of the new and improved models. Just purchase a simple, standard flapper.
Turn the water off below the toilet at the shut-off valve, remove the lid from the tank, then flush the toilet holding the handle down to drain as much of the water out of the tank as possible. To remove the old flapper, simply remove any chain or connection going to the handle mechanism.
The flapper, being made of rubber, should stretch a bit to be able to unhook it from the mounting ears that protrude from the overfill pipe. Some flappers will have an overfill pipe option or the ear mounting option. If you do not need the pipe mount option, and probably won’t, simply cut along the line on both sides of the mount leaving the ear mounts intact.
Reverse the process, reconnect the chain back to the handle arm, turn the water back on, and you are done. Do a trial flush before you replace the tank lid to ensure it cuts off at or about the same level as before, below the overfill pipe. Make sure the chain connecting the flapper to the flush arm does not interfere with the flapper making a good seal. Good Job!
Replacing Toilet Fill Valve Assembly
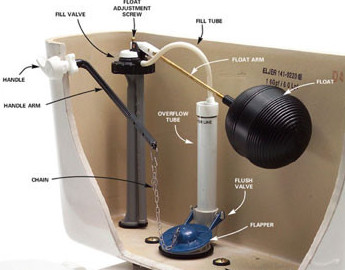
The toilet valve assembly will wear out over time and need to be replaced. If it bubbles and gurgles or just will not completely shut off and water keeps going down the overfill tube regardless of how many times that you adjust your float system, it may be time to replace it.
There are many types out there but the two most common are the old ball float and the container float. They are generally interchangeable and you can use either, no matter which one you presently have. I prefer the Fluidmaster but the old ball float type will work just fine and any of the others that you may prefer will also do the job.
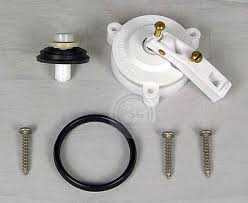
Just a heads up: There are rebuild kits that are relatively inexpensive that can be purchased to repair your valve instead of replacing it. Take a photo of the valve in your tank, making note of the brand, make your way to the hardware store and see what you can find. They come with instructions and are fairly easy to do. Just do not forget to turn the shutoff valve to the closed position before you get started.
If the mechanism has some age on it, is jacked up, or you just rather have all-new, it is really not that difficult and can be done in a few hours.
First, after you have made your purchase of the new one, remove the lid from the tank, turn the shut off to the closed position, and flush the toilet, holding the handle down to remove as much water as you can. The water that may be left at the bottom can be soaked up with a sponge. The more you remove is the less that can end up on the floor.
You will undoubtedly be dealing with plastic fittings so just keep this in mind when loosening and tightening them. Okay, take the channel locks and loosen the wide nut at the top of the supply line where it enters the bottom of the tank. That nut will have a rubber or plastic bulbous seal pushed into the fitting that makes it watertight.
Once the nut is completely backed off of the threads, slightly pull down separating it from the tank, you will have the water you left in the tank coming out now so have a small container or bowl handy to catch what you can. That sponge would be handy here as well.
Next, there will a narrower nut that secures the base of the valve to the bottom of the tank. Remove this taking note of the placement of the gaskets as you lift the valve body up and out from the top of the tank. There could be a small plastic tube coming from the top of the valve and attached to the overfill tube, remove it.
Reverse the process, using the gaskets in their proper places. If you are going to a different style of valve read the instructions on how to adjust the tank water level but do this after you have completed the installation. Make sure all of your connections are good and snug, turn the water back on, watching the water level in your tank and make adjustments as necessary according to the instructions. Good Job!
Replacing Tank Mount Bolts and Gaskets
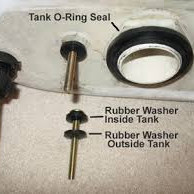
If your commode has some age on it and you are replacing the fill valve assembly anyway, this may be something to consider doing at that same time. The gaskets between the tank and the bowl can leak after some age and the thing is that they usually leak at a very slow rate.
The flooring can soak up this moisture and over time can start to rot the floor around the base and under the toilet. It would pay to periodically check for moisture in this area. You can buy a complete gasket kit at your local hardware.
Let’s get started! Turn the water off at the shutoff valve below your toilet. Remove the lid from the tank and flush, holding the handle down to get as much of the water out as possible. Take your sponge and soak up the remaining water. Remove the supply line from the bottom of the tank.
At the bottom of the tank, there will be either two or three brass screws that hold the tank to the back of the bowl. To remove these take an appropriate size bladed screwdriver and begin to back them out. If you feel that the nut on the bottom is turning as swell you will need to hold it while loosening.
With these removed, the tank can be separated from the top of the bowl.
You can work on it where you are or carry it to a more convenient work area. Remove any remaining fasteners, the old gaskets, and clean the bottom to ready for placement of the new gaskets. Put the screws with the rubber washers from inside the tank, through the hole in the bottom of the tank.
Next, put a rubber washer on followed by a metal washer, and with the nuts tighten snug, do not overtighten. Put the large rubber gasket over the fitting that passes through the toilet in the middle of the tank. Next line up the screw with the holes going through the toilet bowl top.
Set evenly and put another washer and nut on the bottom of the same screw and tighten snug, do not overtighten. Replace the waterline and your ready for a trial run and a thorough leak check. An additional leak check would be advised around one week out and then another at about a month after your repair is complete. Good Job!
Toilet Leaking From the Base
Continually finding water around the base of your toilet can only mean something is leaking somewhere. That something and somewhere should be determined before we proceed. The reason being that the toilet tank mounting bolts and tank gasket will produce the same consequences when they leak and we want to be sure of what we need to fix.
Take a dry rag and dry the area all around the base of the toilet. Now take a flashlight and observe very close around the base of the toilet where it meets the floor. Look for any signs of water. You can flush several times while you are making your observations.
Also dry all around the base of the tank where it meets the bowl, especially in the back against the wall as far as you can reach. Again, with the flashlight observe this area while you flush several times. These observations should shed some light on where exactly the problem lies.
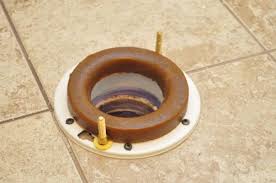
Determining that water is indeed is coming out from under the base of your toilet, head on down to the nearest hardware and purchase a set of toilet bolts and a wax ring. Now you are ready to begin. Shut the water supply off under the toilet at the shutoff valve. Flush the toilet and hold the handle down allowing as much water to exit the tank as possible.
Remove the supply line from the bottom of the tank. Next, loosen and remove the nuts from the toilet bolts at the base, there are two, so with both nuts off of the bolt, straddle the toilet with a leg on each side of the bowl, facing the wall, reach under each side of the tank with your arms and lift.
At this point, it might be better to get some help to carry the john out back or to the garage. Bear in mind that there is an S- bend or trap within the base of the toilet that holds water and will slosh out if not carried level.
Once out tip over and clean all the wax and crud from the bottom of the toilet. I have when working alone, set them into the bathtub, tip over, and remove the old wax. Save a couple of globs of wax for later use
Set the new wax ring into place on top of the toilet flange. Then take a globe of wax and mash around the new bolts to hold them erect while you lower the toilet into place. Tighten the nuts onto the bolt and tighten each a little at a time being careful not to overtighten.
Replace the supply line, turn the water back on, and flush. Good Job!
These are the basic problems that a homeowner may encounter and is definitely a project one can do instead of paying a plumber to do it for you.
Click the image below for awesome plumbing deals and have them shipped to your front door!
